TM-9-2815-205-24 - Page 230 of 856
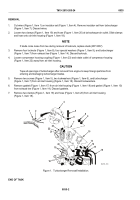
REMOVAL
1.
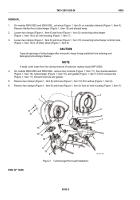
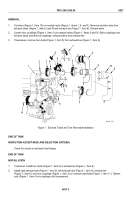
Cut wires (Figure 1, Item 1) on insulator set (Figure 1, Item 4). Remove insulator set from turbocharger
(Figure 1, Item 7). Discard wires.
2.
Loosen two clamps (Figure 1, Item 19) and hose (Figure 1, Item 20) at turbocharger air outlet. Slide clamps
and hose onto air inlet housing (Figure 1, Item 18).
NOTE
If studs come loose from tee during removal of locknuts, replace studs (WP 0037).
3.
Remove four locknuts (Figure 1, Item 8), four special washers (Figure 1, Item 9), and turbocharger
(Figure 1, Item 7) from exhaust tee (Figure 1, Item 14). Discard locknuts.
4.
Loosen compressor housing coupling (Figure 1, Item 23) and rotate outlet of compressor housing
(Figure 1, Item 22) away from air inlet housing.
CAUTION
Tape all openings of turbocharger after removal from engine to keep foreign particles from
entering and damaging turbocharger blades.
5.
Remove two screws (Figure 1, Item 5), two lockwashers (Figure 1, Item 6), and turbocharger
(Figure 1, Item 7) from air inlet housing (Figure 1, Item 18). Discard lockwashers.
6.
Remove gasket (Figure 1, Item 17) from air inlet housing (Figure 1, Item 18) and gasket (Figure 1, Item 10)
from exhaust tee (Figure 1, Item 14). Discard gaskets.
7.
Remove two clamps (Figure 1, Item 19) and hose (Figure 1, Item 20) from air inlet housing
(Figure 1, Item 18).
4
13
14
17
15
7
1
2
3
8
10
9
2
6
20
19
16
18
21
23
22
5
11
12
MAINT_093
Figure 1.
Turbocharger Removal/Installation.
END OF TASK
TM 9-2815-205-24
0035
0035-2
Back to Top

