TM-9-2815-205-24 - Page 410 of 856
REMOVAL
1.
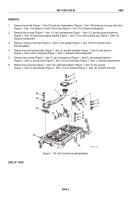
Remove 22 screw and washer assemblies (Figure 1, Item 12) from oil pan (Figure 1, Item 1).
2.
Remove oil pan (Figure 1, Item 1) and gasket (Figure 1, Item 8). Discard gasket.
3.
If necessary, remove following fittings from oil pan:
a.
For model 5063-5299: adapter (Figure 1, Item 2), two plugs (Figure 1, Item 3), plug (Figure 1, Item 4),
and plug (Figure 1, Item 13)
b.
For model 5063-5392: adapter (Figure 1, Item 11), two plugs (Figure 1, Item 6), plug
(Figure 1, Item 7), and elbow (Figure 1, Item 5)
c.
For models 5063-5393 and 5063-539L: plug (Figure 1, Item 10) and elbow (Figure 1, Item 9)
MODEL
5063-5299
MODEL
5063-5392
RIGHT SIDE
LEFT SIDE
BOTTOM VIEW
MODEL
5063-5392
MODEL
5063-5299
MODELS
5063-5393
5063-539L
1
2
3
4
5
6
7
9
8
6
11
12
3
13
10
MAINT_177
Figure 1.
Oil Pan Removal/Installation.
END OF TASK
TM 9-2815-205-24
0063
0063-2
Back to Top


