TM-5-3805-254-14-P-2 - Page 352 of 894
TRUCK SERVICE MANUAL
ENGINE
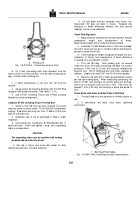
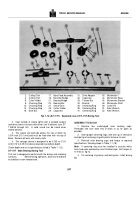
(ST-1177-16), Fig. 1-16, through centering rings rotating
slowly.
Bar should spin free.
Slide bar out one end until
appropriate checking ring can be installed in bar.
Oil outside
diameter of checking ring.
5.
Using light finger pressure against checking ring (ST-
1177-13) on both sides of bar, push checking ring through
each bore.
Bar must be turned during this check.
a.
Check bore for burrs if checking ring will not pass
through bore.
b.
A 0.003 inch [0.08 mm] feeler gauge (not over 1/2 inch
[12.70 mm] wide) can be used in detecting irregularities in the
bore.
c.
Attempt to insert feeler gauge between bore and bar or
slip ring as used on ST-1177 Boring Tool.
Run gauge
completely around bar or slip ring on each side of bore.
Evaluate as follows:
(1) Gauge does not enter at any point, bar rotates freely std.
bore.
(2) Gauge enters on one side and not on opposite slight
misalignment.
No problem if bar rotates freely.
(3) Gauge loose oversize bore.
(4) Gauge enters on front and not on rear of bore tapered
bore.
6.
Mark bores to be salvaged.
ASSEMBLING MICROMETER TOOL BIT
SETTING GAUGE
AND TOOL BIT
1.
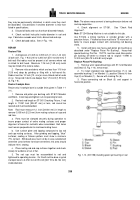
Place micrometer base shaft (ST-1177-46) through
bore of micrometer bracket (ST-1177-45) and thread into
micrometer base (ST-1177-44).
Tighten securely.
2.
Tighten the socket head screw (ST-1177-29) in the
micrometer .bracket until the bracket is tight on the micrometer
base shaft; micrometer hole in micrometer bracket must be in
alignment with cutting tool hole in micrometer base shaft.
3.
Install centering ring (ST-1177-39) over micrometer
base shaft and micrometer (ST-1177-43) in micrometer
bracket:
a.
Adjust micrometer thimble to value stamped on
centering ring.
b.
Hold micrometer spindle against centering ring and
tighten socket head screw in micrometer bracket.
Check to
see that micrometer spindle turns free.
4.
Remove centering ring and install appropriate cutter
holder over micrometer shaft.
5.
Align tool bit hole in cutter holder with hole through
micrometer base shaft and tighten cutter holder socket head
screws.
Scribed lines are used on the base shaft and cutter
holder for this purpose.
Keep even gaps between two halves
of cutter holder.
6.
Insert appropriate cutting bit in tool holder.
Tool must
be short enough so it does not extend into the bore of the tool
holder.
When adjusting micrometer or tool cutter, be careful to
"just contact" tool to prevent damage.
7.
With cutter key (ST-1177-49) adjust tool bit against
micrometer spindle and tighten tool bit retaining screw in cutter
holder, back off micrometer and check tool bit setting.
Note
:
Do not tighten micrometer spindle against tool bit point
or carbide may be chipped.
Do not sweep micrometer spindle
across carbide cutter for it will chip cutting edge.
8.
Back off micrometer and remove cutter holder from
micrometer base shaft.
CUTTING BORES
1.
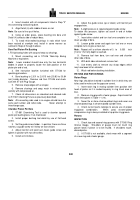
Install bore feed assembly (ST-1177-17) in one end of
boring bar and tighten socket head screw (ST-1177-32).
2.
Install torsion bar (ST-1177-33), threaded end first,
through bore feed assembly, (ST-1177-17) start threads into
end hole of torsion bracket (ST-1 177-34).
The flats on bar
can be used to secure it to bracket.
3.
Locate tapped hole in end of block and secure torsion
bracket to block with a suitable capscrew and washer.
4.
Pull out on plastic knob of feed assembly until pin is
free of slot and turn one-fourth (1/4) turn, then pull complete
feed assembly back all the way to the knob and tighten wing
setscrew in feed assembly to secure on torsion bar.
5.
Install square head set bolt in second threaded hole of
torsion bracket end and tighten snug against cylinder block to
stabilize torsion assembly.
6.
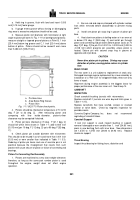
Turn plastic knob on drive assembly one-fourth (1/4)
turn until pin seats in groove.
7.
Install adapter (ST-1177-31) in other end of boring bar
with the 1/2 inch square drive out.
Lock with socket head
setscrew.
8.
Lock swivel joint (ST-1177-27) in a 1/2 inch drill chuck.
These instructions assume use of a right hand rotation drill.
9.
Install tool bit holder on boring bar, next to journal to
be cut.
When operating, boring bar will feed toward feed
assembly.
Make sure tool bit cutting edge is turned in
direction of drill rotation.
10.
With swivel joint on boring bar adapter, bore the
journal.
Keep boring bar well lubricated during all boring
operations.
348
Back to Top

