TM-9-2320-273-34 - Page 165 of 801
TM9-2320-273-34
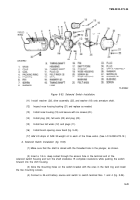
(10) Remove screw (10), Iockwasher (11) and guard washer (12), insulating bushing (13), three
insulating washers (14). Remove four brush holder and spring assemblies (19).
(11) Remove jumper screw (9), two nuts (1), three insulating washers (4), (5) and (8), guard
washer (25), two Iockwashers (24), lead assembly (2), two washers (3), two insulating bushings (6) and
sealing ring (7) from commutator end housing (21).
NOTE
Do not remove the commutator end housing
bushing (20) unless inspection reveals a need
for replacement,
(12) Remove the commutator end housing bushing (20) by pulling it out from the inside of the
housing (21) with a slide hammer.
5-11. Cleaning.
Compressed air used for cleaning purposes
will not exceed 30 psi. Use only-with
effective chip guarding and personal
protective equipment (goggles/shield,
gloves, etc).
a. Clean the solenoid switch, armature, field coils and drive assembly with SD-2 cleaning solvent (Item
12, App B). Dry the parts using clean, dry, compressed air.
Do not immerse the drive assembly in
cleaning solvent. The drive is permanently
lubricated and contains a special lubricant.
b.
Clean all other metal parts thoroughly with cleaning solvent and a wire brush, if necessary.
c. Clean the six insulating washers (4), (5), (8) and (14), three insulating bushings (6) and (13), and
brushes (18) if they are to be reused.
5-12. Inspection and Test.
a.
Housings.
Inspect the drive housing, commutator end housing, field ring, and solenoid shell and
brackets for cracks, breaks, damaged threads, or other defects.
b. Armature.
(1) On the armature,
inspect the commutator contact surface. A satisfactory condition is
indicated by an even, highly burnished dark copper color. If the contact surface is rough, pitted, scored,
burned or coated with hard carbon or oil, the commutator must be resurfaced, provided it is determined
to be in good mechanical and electrical condition as a result of the following steps.
5-37
WARNING
CAUTIO N
Back to Top


