TM-9-2330-202-13-P - Page 247 of 552
ASSEMBLY - Continued
6.
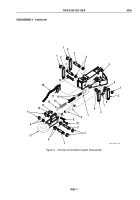
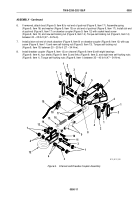
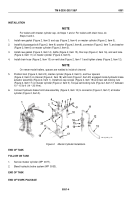
If removed, attach boot (Figure 9, Item 8) to rod end of pushrod (Figure 9, Item 17). Assemble spring
(Figure 9, Item 16) and washer (Figure 9, Item 15) on slot end of pushrod (Figure 9, Item 17). Install slot end
of pushrod (Figure 9, Item 17) on drawbar coupler (Figure 9, Item 12) with socket head screw
(Figure 9, Item 10) and new self-locking nut (Figure 9, Item 14). Torque self-locking nut (Figure 9, Item 14)
between 20 – 25 lb-ft (27 – 34 N•m).
7.
Install piston rod end of shock absorber (Figure 9, Item 9) on drawbar coupler (Figure 9, Item 12) with cap
screw (Figure 9, Item 11) and new self-locking nut (Figure 9, Item 13). Torque self-locking nut
(Figure 9, Item 13) between 20 – 25 lb-ft (27 – 34 N•m).
8.
Install drawbar coupler (Figure 9, Item 12) on channel (Figure 9, Item 6) with eight bearings
(Figure 9, Item 4), four shafts (Figure 9, Item 3) and links (Figure 9, Item 2), and eight new self-locking nuts
(Figure 9, Item 1). Torque self-locking nuts (Figure 9, Item 1) between 35 – 40 lb-ft (47 – 54 N•m).
1
1
2
2
3
3
4
5
13
6
4
4
2
2
1
1
7
8
9
10
11
3
1
3
4
12
4
1
14
15
18
16
17
19
20
M116_M101_095
Figure 9.
Channel and Drawbar Coupler Assembly.
TM 9-2330-202-13&P
0050
0050-11
Back to Top

