TM-9-2350-260-20-1-2 - Page 672 of 772
TM 9-2350-260-20-1-2
ACCELERATOR CONNECTING LINK ASSEMBLY REPLACEMENT (Sheet 2 of 4)
3.
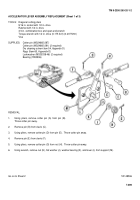
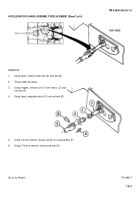
Using pliers, remove cotter pin (B) from pin (C).
Throw cotter pin (B) away.
4.
Remove pin (C) from clevis (D).
5.
Go to driver's station.
6.
Using pliers, remove cotter pin (E) from pin (F).
Throw cotter pin away.
7.
Remove pin (F) from clevis (G).
8.
Remove connecting link (H) and attached part from tank.
9.
Using wrench, loosen jamnut (J) while holding clevis (D) with pliers.
NOTE
Write down number of turns needed to remove clevis (D).
10.
Remove clevis (D) and jamnut (J) from connecting link (H).
11.
Using wrench, loosen jamnut (K) while holding clevis (G) with pliers.
NOTE
Write down number of turns needed to remove clevis (G).
12.
Remove clevis (G) and jamnut (K) from connecting link (H).
Go on to Sheet 3
TA148510
7-403
Back to Top

