TM-9-2815-205-24 - Page 252 of 856
REMOVAL
1.
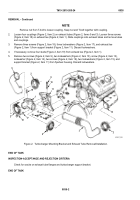
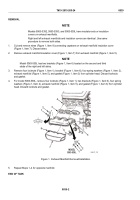
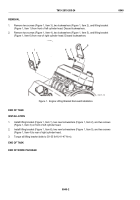
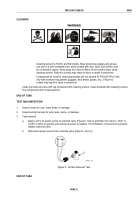
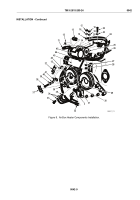
Remove long screw (Figure 1, Item 6), mid-sized screw (Figure 1, Item 3), short screw (Figure 1, Item 10),
three lockwashers (Figure 1, Item 2), three flat washers (Figure 1, Item 1), large diameter screw
(Figure 1, Item 7), lockwasher (Figure 1, Item 8), flat washer (Figure 1, Item 9), spacer (Figure 1, Item 4),
and bracket (Figure 1, Item 5) from front of engine. Discard lockwashers.
2.
Remove five short screws (Figure 1, Item 11), five lockwashers (Figure 1, Item 14), three long screws
(Figure 1, Item 12), three lockwashers (Figure 1, Item 13), and engine bracket (Figure 1, Item 15) from lower
front cover (Figure 1, Item 16). Discard lockwashers.
13
1
12
5
12
6
9
11
14
10
2
14
1
13
12
14
11
14
12
13
15
16
2
3
4
8
7
11
MAINT_105
Figure 1.
Engine Front Mounting Bracket Removal/Installation.
END OF TASK
INSTALLATION
1.
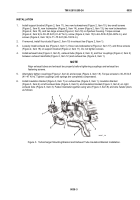
Install engine bracket (Figure 1, Item 15), five new lockwashers (Figure 1, Item 14), five short screws
(Figure 1, Item 11), three new lockwashers (Figure 1, Item 13), and three long screws (Figure 1, Item 12) on
lower front cover (Figure 1, Item 16). Torque screws (Figure 1, Item 12) to 30–35 lb-ft (41–47 N·m) and
screws (Figure 1, Item 11) to 46–50 lb-ft (62–68 N·m).
2.
Install bracket (Figure 1, Item 5), spacer (Figure 1, Item 4), three flat washers (Figure 1, Item 1), three new
lockwashers (Figure 1, Item 2), long screw (Figure 1, Item 6), mid-sized screw (Figure 1, Item 3), short
screw (Figure 1, Item 10), flat washer (Figure 1, Item 9), new lockwasher (Figure 1, Item 8), and large
diameter screw (Figure 1, Item 7) on bracket (Figure 1, Item 15). Torque screw (Figure 1, Item 7) to
46–50 lb-ft (62–68 N·m) and screws (Figure1, Items 3, 6, and 10) to 30–35 lb-ft (41–47 N·m).
END OF TASK
END OF WORK PACKAGE
TM 9-2815-205-24
0041
0041-2
Back to Top

