TM-9-2815-205-24 - Page 446 of 856
INSTALLATION
CAUTION
Crankshaft surface must be clean and smooth to prevent damage to seal lip when
a new seal is installed.
Do not scratch or nick sealing edge of oil seal or oil leakage past seal will result.
Do not lubricate new seal or crankshaft end prior to installation. Teflon-lip oil seals
must be installed dry for proper sealing.
NOTE
Teflon-lip oil seal is packaged with plastic sleeve to protect seal lip during shipment
and function as an installation tool.
If oil seal is off plastic installation sleeve, push larger end of sleeve through seal in
same direction seal lip is pointing.
1.
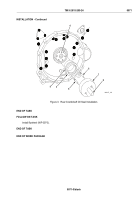
Place installation sleeve (Figure 3, Item 9) and seal (Figure 3, Item 3) together on crankshaft
(Figure 3, Item 4).
2.
Slide seal (Figure 3, Item 3) off installation sleeve (Figure 3, Item 9) and onto crankshaft. Remove sleeve.
3.
Install two guide studs (Figure 3, Item 6) in crankshaft.
NOTE
If ridge is present on crankshaft from previous oil seals, do not drive oil seal completely into
flywheel housing. Drive oil seal only onto a smooth section of crankshaft. Do not drive oil
seal more than 1/8 inch from original position.
4.
Using seal inserter (Figure 3, Item 7) with driver handle (Figure 3, Item 8), drive seal until seal inserter
contacts face of flywheel housing.
5.
Remove seal inserter (Figure 3, Item 7), two guide studs (Figure 3, Item 6), and driver handle
(Figure 3, Item 8).
TM 9-2815-205-24
0071
0071-4
Back to Top


