TM-9-2330-202-13-P - Page 184 of 552
LAMP REPLACEMENT - Continued
2.
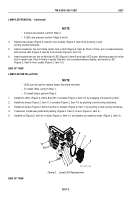
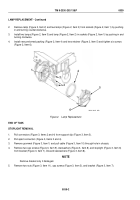
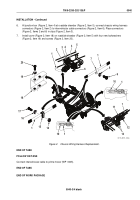
Remove lamp (Figure 2, Item 2) and two lamps (Figure 2, Item 3) from sockets (Figure 2, Item 1) by pushing
in and turning counterclockwise.
3.
Install two lamps (Figure 2, Item 3) and lamp (Figure 2, Item 2) in sockets (Figure 2, Item 1) by pushing in and
turning clockwise.
4.
Install new preformed packing (Figure 2, Item 4) and lens retainer (Figure 2, Item 5) and tighten six screws
(Figure 2, Item 6).
4
5
6
3
2
1
M116_M101_058
Figure 2.
Lamp Replacement.
END OF TASK
STOPLIGHT REMOVAL
1.
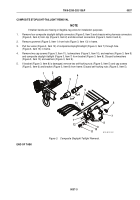
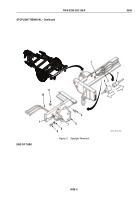
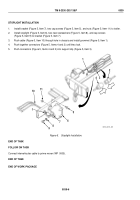
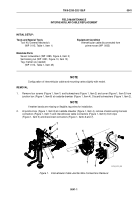
Pull connectors (Figure 3, Items 2 and 4) from support clip (Figure 3, Item 3).
2.
Pull apart connectors (Figure 3, Items 2 and 4).
3.
Remove grommet (Figure 3, Item 1) and pull cable (Figure 3, Item 10) through hole in chassis.
4.
Remove two cap screws (Figure 3, Item 9), starwashers (Figure 3, Item 8), and stoplight (Figure 3, Item 6)
from bracket (Figure 3, Item 7). Discard starwashers (Figure 3, Item 8).
NOTE
Remove bracket only if damaged.
5.
Remove two nuts (Figure 3, Item 11), cap screws (Figure 3, Item 5), and bracket (Figure 3, Item 7).
TM 9-2330-202-13&P
0039
0039-2
Back to Top

