TM-9-2330-202-13-P - Page 267 of 552
BLEEDING - Continued
NOTE
Make sure master cylinder is kept full of brake fluid at all times during bleeding or air will enter
the system, making it necessary to bleed the system again.
6.
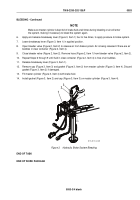
Apply and release breakaway lever (Figure 3, Item 1) four to five times, to apply pressure to brake system.
7.
Leave breakaway lever (Figure 3, Item 1) in applied position.
8.
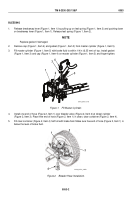
Open bleeder valve (Figure 2, Item 2) to release air from brake system. Air is being released if there are air
bubbles in clear container (Figure 2, Item 4).
9.
Close bleeder valve (Figure 2, Item 2). Remove hose (Figure 2, Item 1) from bleeder valve (Figure 2, Item 2).
10.
Repeat Steps 6 through 9 until fluid in clear container (Figure 2, Item 4) is free of air bubbles.
11.
Release breakaway lever (Figure 3, Item 1).
12.
Remove cap (Figure 3, Item 3) and gasket (Figure 3, Item 2) from master cylinder (Figure 3, Item 4). Discard
gasket (Figure 3, Item 2) if damaged.
13.
Fill master cylinder (Figure 3, Item 4) with brake fluid.
14.
Install gasket (Figure 3, Item 2) and cap (Figure 3, Item 3) on master cylinder (Figure 3, Item 4).
1
2
3
4
M116_M101_4-82B
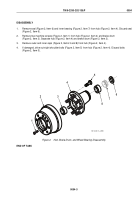
Figure 3.
Hydraulic Brake System Bleeding.
END OF TASK
END OF WORK PACKAGE
TM 9-2330-202-13&P
0053
0053-3/4 blank
Back to Top

