TM-9-2330-202-13-P - Page 266 of 552
BLEEDING
1.
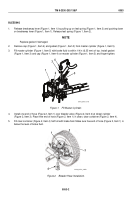
Release breakaway lever (Figure 1, Item 1) by pulling up on leaf spring (Figure 1, Item 2) and pushing down
on breakaway lever (Figure 1, Item 1). Release leaf spring (Figure 1, Item 2).
NOTE
Replace gasket if damaged.
2.
Remove cap (Figure 1, Item 4) and gasket (Figure 1, Item 3) from master cylinder (Figure 1, Item 5).
3.
Fill master cylinder (Figure 1, Item 5) with brake fluid to within 1/4 in (6.35 mm) of top. Install gasket
(Figure 1, Item 3) and cap (Figure 1, Item 4) on master cylinder (Figure 1, Item 5) and finger-tighten.
1
2
3
4
5
M116_M101_4-81
Figure 1.
Fill Master Cylinder.
4.
Install one end of hose (Figure 2, Item 1) over bleeder valve (Figure 2, Item 2) at wheel cylinder
(Figure 2, Item 3). Place free end of hose (Figure 2, Item 1) in clean, clear container (Figure 2, Item 4).
5.
Fill clear container (Figure 2, Item 4) half full with brake fluid. Make sure free end of hose (Figure 2, Item 1) is
below the level of brake fluid.
1
2
3
4
M116_M101_4-82A
Figure 2.
Bleeder Hose Installation.
TM 9-2330-202-13&P
0053
0053-2
Back to Top

