TM-9-2350-311-20-2 - Page 574 of 828
TM 9–2350–311–20–2
14–10
Change 3
14–2 GUNNER’S ESCAPE HATCH (MODIFIED) — CONTINUED
c.
Assembly
WARNING
Adhesives can burn easily, can give off harmful vapors, and are harmful to skin and clothing. To
avoid injury or death, keep away from open fire and use in well-ventilated area. If adhesive gets on
skin or clothing, wash immediately with soap and water.
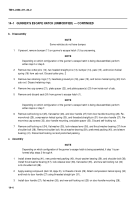
1
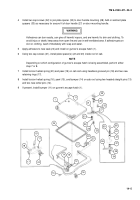
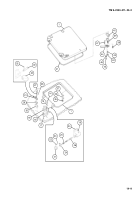
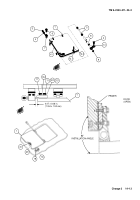
Apply adhesive to recess on gunner’s escape hatch (1).
2
Apply sealing compound, (item 30, Appx D), to threads of threaded straight pin (47). Attach compression
helical spring (46) and knob (45) to door handle (44) using threaded straight pin (47).
3
Install door handle (44), flat washer (43), and new self-locking nut (42) on door handle mounting.
4
Apply adhesive to new seal (41) and install on gunner’s escape hatch (1).
5
Install two cap screws (38) to join plate spacer (40) to door handle mounting (39). Add or subtract plate
spacers (40), as necessary, for secure fit of door handle (44) on door handle mounting (39).
6
Using two cap screws (35), install plate spacer (36), and plate spacer(s) (37) inside roof of cab.
7
Install catch strike (13) using two new lockwashers (12) and two cap screws (11).
NOTE
Step 7.1 applies to vehicles with slotted catch strike.
7.1
Install slotted catch strike (12.1) using two new lockwashers (12) and two cap screws (11).
8
Reassemble bumper assembly (31) by installing bumper (34), headed straight pin (33), and new cotter pin
(32).
9
Reassemble latch assembly (18):
(a)
Install headless shoulder pin (26) and compression helical spring (25) in latch body (20).
(b)
Apply sealing compound (item 30, Appx D) to threads of four machine screws (22). Install access cover
(24), four new lockwashers (23), and four machine screws (22).
(c)
Apply sealing compound (item 30, Appx D) to threads of knob (21) and install.
(d)
Pack latch body (20) with grease through lubrication fitting hole and install lubrication fitting (19).
10
Install bumper block (30), new shims (29), equal to disassembly, and bumper assembly (31) using two new
lockwashers (28), and two cap screws (27).
11
Install latch assembly (18), latch block (17), and new shim(s) (16), equal to disassembly, using four new
lockwashers (15) and four cap screws (14).
Back to Top


