TM-9-2350-311-20-2 - Page 583 of 828
TM 9–2350–311–20–2
Change 3
14–19
c.
Assembly
WARNING
Adhesives can burn easily, can give off harmful vapors, and are harmful to skin and clothing. To
avoid injury or death, keep away from open fire and use in well-ventilated area. If adhesive gets on
skin or clothing, wash immediately with soap and water.
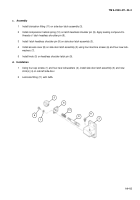
1
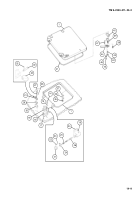
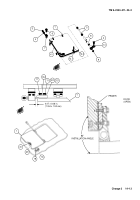
Apply adhesive to new strip (25.1) and to seal seat on left cab side door (1). Install strip on left cab side
door.
2
Apply adhesive to new seal (25) and to strip (25.1) on left cab side door (1). Install seal to strip on left cab
side door.
3
Apply sealing compound to threads of knob (22). Install knob, compression helical spring (24), and threaded
straight pin (23) on door handle (20).
4
Install door mounting handle (21) using two cap screws (26).
5
Install door handle (20) on door mounting handle (21) using flat washer (19) and new self-locking nut (18).
6
Install new plate spacer(s) (16), as needed, and plate spacer (17) on left side door using two cap screws
(15).
7
Apply zinc chromate paste to left cab side door (1) where door mounting handle (21) was removed and to all
aluminum-to-steel contacts.
8
Install handle assembly (13) inside left cab side door (1) using two cap screws (14).
9
Install catch strike (12) on outside of left cab side door (1) using two cap screws (10) and two new lock-
washers (11).
NOTE
Step 10 applies to vehicles with slotted catch strike.
10
Install slotted catch strike (11.1) on outside of left cab side door (1), using two cap screws (10) and two new
lockwashers (11).
25
18
19
20
22
24
23
26
21
25.1
Back to Top

