TM-9-2815-205-24 - Page 567 of 856
INSPECTION-ACCEPTANCE AND REJECTION CRITERIA
1.
Follower inspection and measuring procedures:
a.
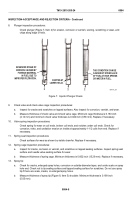
Measure distance between top of follower (Figure 6, Item 1) and slot. Dimension must be 1.645 to
1.649 inches (41.78 to 41.88 mm).
1.645–1.649 in.
(41.78–41.88 mm)
1
MAINT_280
Figure 6.
Follower Inspection.
b.
Inspect stop pin groove in side of follower for smoothness and damage. Discard follower if there is
more than 0.002 inch (0.051 mm) wear on top or there is other visual damage or wear.
2.
Follower spring inspection procedures:
a.
Examine outside diameter of follower spring coils for wear caused by rocker arms contacting coils.
Replace if worn.
b.
Inspect follower springs for damage from rust, pitting, nicks, or notches in coils, broken coils, broken
coil ends, and notches under coil ends. Replace if damaged.
c.
Check spring tension with spring tester. Replace spring when a load of less than 78 lbs (35.4 kg) will
compress it to 1.028 inches (26.11 mm).
3.
Injector body inspection procedures:
Inspect injector body threads, bushing seating surface, and fuel connector ring spacer sealing
surfaces for damage. Inspect rack hole, body preformed packing sealing surface, clamp radius, and
dowel pin. Replace if necessary.
4.
Fuel connectors inspection procedures:
Check condition of jumper line sealing surfaces, copper ring spacer sealing surfaces, and fuel
connector threads. Replace if necessary.
5.
Control rack inspection procedures:
a.
Check injector control rack for straightness, rack teeth for damage, and notch in clevis for wear. Check
rack for nicks, burrs, or rust.
b.
Notch in clevis should be 0.3125 to 0.3145 inch (7.938 to 7.988 mm).
6.
Gear and gear retainer inspection procedures:
Inspect gear and gear retainer for nicks, burrs, or rust. Check gear teeth for wear.
7.
Bushing inspection procedures:
Check bushing lapped sealing surface for scratches and bushing internal diameter for scoring. Check
condition of dowel pin. Check for corrosion and varnish. Replace if necessary.
TM 9-2815-205-24
0084
0084-7
Back to Top


