MWO-5-2350-262-35-2 - Page 9 of 33
MWO 5-2350-262-35-2
2
-
4
NOTE
Steps 2 through 4 below apply to Figure 2-2.
2.
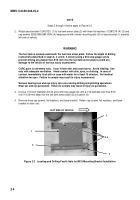
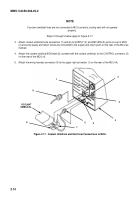
Attach base bracket (12475721) (1) to fuel tank armor plate (2) with three flat washers (12387279-14) (3) and
cap screws (B1821BH038F100N) (4) keeping end with shorter mounting rails (5) on base bracket (1) towards
left side of vehicle.
WARNING
The fuel tank is located underneath the fuel tank armor plate.
Follow the depth of drilling
instructions described in steps b. 3. and b. 5. below (using a drill stop gauge set) to
prevent drilling any deeper than 9/16 inch into the fuel tank armor plate to avoid any
damage to the vehicle or serious injury to personnel.
CARC paint is extremely toxic.
It can irritate skin and cause burns.
Avoid inhaling.
Use
only with adequate ventilation.
Avoid contact with skin, eyes, or clothing.
In case of
contact, immediately flush skin or eyes with water for at least 15 minutes.
Get medical
attention for eyes.
Failure to comply may result in injury to personnel.
Serious hearing loss and eye injury can occur during drilling and grinding operations.
Wear ear and eye protection.
Failure to comply may result in injury to personnel.
3.
Using a 7/16 inch diameter drill bit and a drill stop gauge set, drill a 7/16 diameter pilot hole 9/16
inch (14.29 mm) deep into the fuel tank armor plate (2) at location (6).
4.
Remove three cap screws, flat washers, and base bracket.
Retain cap screws, flat washers, and base
bracket for later use.
LEFT SIDE OF VEHICLE
2
3, 4
1
6
5
Figure 2-2.
Locating and Drilling Fourth Hole for MCU Mounting Bracket Installation.
Back to Top

