TM-9-1200-215-34-P - Page 105 of 266
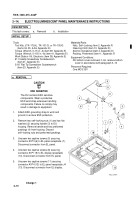
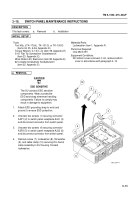
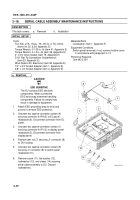
TM 9–1200–215–34&P
3–14
3–15.
SWITCH PANEL MAINTENANCE INSTRUCTIONS CONTINUED
a.
REMOVAL CONTINUED
5.
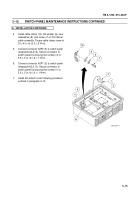
Loosen 12 captive flat tip screws (11)
securing
switch panel (12) to DU housing. Remove
switch panel from DU housing.
6.
Remove EMI shielding gasket (13) from DU.
CAUTION
The EMI shielding gasket is vital to
this piece of equipment and is easily
damaged. Handle with care when
removing or replacing it. Gasket will
break if stretched. Failure to comply
may result in damage to equipment.
7.
Inspect EMI shielding gasket (13) for cuts,
nicks, or signs of stretching or deterioration.
Discard EMI shielding gasket if unserviceable.
b.
INSTALLATION
CAUTION
ESD SENSITIVE
The DU contains ESD sensitive
components. Wear a protective
ESD wrist strap whenever handling
components. Failure to comply may
result in damage to equipment.
1.
Attach ESD grounding strap to wrist and
ground, to ensure ESD protection.
CAUTION
The EMI shielding gasket is vital to
this piece of equipment and is easily
damaged. Handle with care when
removing or replacing it. Gasket will
break if stretched. Failure to comply
may result in damage to equipment.
2.
Place EMI shielding gasket (13) into gasket
groove in DU housing.
NOTE
DU housing must be elevated to
insert and secure switch panel.
3.
Refer to illustration for proper placement and
place switch panel (12) in DU housing. Secure
switch panel to DU housing by torquing 12
captive flat tip screws (11) to 9.5
"
.5 in.–lb
(1.1
"
.1 N
S
m).
11
12
13
Back to Top


