TM-9-1200-215-34-P - Page 136 of 266
TM 9–1200–215–34&P
4–22
4–20.
SPRING LATCH ASSEMBLY
DESCRIPTION
This task covers:
a.
Removal
b.
Installation
INITIAL SETUP
Tools:
Tool Kit, JTK–17LAL (item 34, Appendix E)
Tool Kit, General Mechanic’s (item 42, Appendix E)
Materials/Parts:
Self–locking Screw (item 7, Appendix F)
Equipment Condition:
Bottom cover removed; if not, remove bottom covers
in accordance with paragraph 4–13
Personnel Required:
One MOS 35Y
a.
REMOVAL
CAUTION
ESD SENSITIVE
•
The PDIU contains ESD sensitive
components.
Wear a protective
ESD wrist strap whenever handling
components.
Failure to comply may
result in damage to equipment.
•
Damage to RFI/EMI contact strip
may occur.
Do not slide cover off of
housing.
Pick cover straight up.
1.
Attach ESD grounding strap to wrist and
ground to ensure ESD protection.
2.
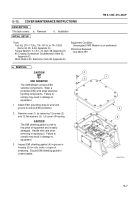
Open two spring latch assemblies (1) at
connector P5 (2).
3.
Unplug connector P5 (2) from connector J8
(3).
4.
Remove self–locking screw (4) securing
damaged spring latch assembly (1) and
connector J8 (3) to PDIU housing (5).
Discard
self–locking screw.
5.
Remove damaged spring latch assembly (1)
from connector J8 (3).
Change 1
1
4
5
3
2
Back to Top


