TM-9-2350-260-20-1-3 - Page 513 of 783
TM 9-2350-260-20-1-3
FINAL DRIVE STUD REPLACEMENT (Sheet 1 of 2)
TOOLS:
1-1/2 in. open end wrench (2 required)
Ball peen hammer
Pipe wrench (2 in. opening)
Ruler
SUPPLIES:
Primer (Item 49, Appendix D)
Sealing compound (Item 26, Appendix D)
Two small brushes (Item 10, Appendix D)
Penetrating oil (Item 43, Appendix D)
PRELIMINARY PROCEDURE:
Remove final drive (page 12-3)
REMOVAL:
NOTE
If stud is bent or cracked, go to step 1.
If stud has damaged threads or is
broken off below threads, go to step 2.
If stud is broken off flush with final
drive
housing,
notify
support
maintenance.
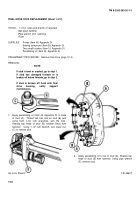
1.
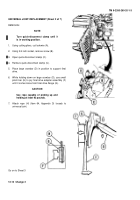
Apply penetrating oil (Item 43, Appendix D) to base
of stud (A).
Thread two hex nub on stud (B) and
using both 1-1/2 inch wrenches, jam the nuts.
Sharply tap head of stud (B) several times with
hammer.
Using 1-1/2 inch wrench, turn lower nut
(C) to remove stud.
2.
Apply penetrating oil to be of stud (A). Sharply tap
head of stud (B) with hammer. Using pipe wrench
(F), remove stud.
Go on to Sheet 2
TA146637
12-6
Back to Top


