TM-9-2330-227-14-P - Page 122 of 576
TM 9-2330-227-14&P
JUNCTION BOXES, 110-VOLT - CONTINUED
ACTION
LOCATION
ITEM
REMARKS
REMOVAL -
CONTINUED
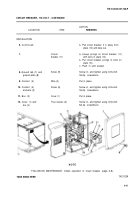
9.
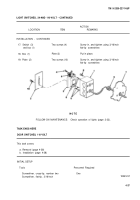
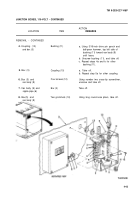
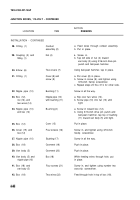
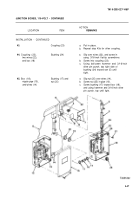
Nipple pipe(1)
Bushing (2)
10.
Cover (3) and
Four screws (5)
box (4)
11.
Box (4)
Cover (3)
12.
Box (4) and
Bushing (6) and
nipple pipe (1)
nut (7)
13.
Nipple pipe (1)
Bushing (6)
14.
Fitting (9)
Cover (10) and
screw (11)
15.
Elbow (12)
Two covers (13)
16.
Coupling (14)
Nut (15)
and fitting (9)
17.
Fitting (9)
18.
Fitting (9)
and nut (15)
19.
Fitting (9)
20.
Fitting (9) and
elbow (12)
21.
Fitting (9),
coupling (19), and
van body (8)
22.
Van body (8)
Conduit
assembly (16)
Two wires (17)
Nut (15)
Screw (18)
Two screws (20)
Fitting (9),
elbow (12), and
coupling (19)
Unscrew, and take off.
Using 3/16-inch flat-tip screwdriver,
unscrew and take off.
Take off.
a. Using 3/16-inch drive pin punch and
ball-peen hammer, tap top of bushing
(6) toward van body (8) until loose.
b. Unscrew nipple pipe (1) from nut (7).
Unscrew, and take off.
a. Using 3/16-inch flat-tip screwdriver,
unscrew screw (11) and take off.
b. Take off cover (10).
Using 3/16-inch flat-tip screwdriver,
pry off.
a. Using 3/16-inch drive pin punch and
ball-peen hammer, tap right side of nut
(15) toward van body (8) until loose.
b. Unscrew all the way.
Take off.
Pull out from fitting (9) and nut (15).
Take off.
Using 3/16-inch flat-tip screwdriver,
unscrew and take off.
Using number two cross-tip screwdriver,
unscrew and take off.
a. Take off, and separate.
b. Repeat steps 14 thru 22a for the
other side.
4-44
Back to Top

