TM-9-2330-227-14-P - Page 124 of 576
4-46
TM 9-2330-227-14&P
JUNCTION BOXES, 110-VOLT - CONTINUED
ACTION
LOCATION
ITEM
REMARKS
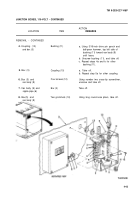
INSTALLATION - CONTINUED
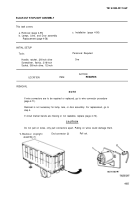
28.
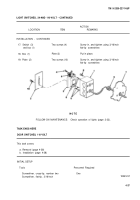
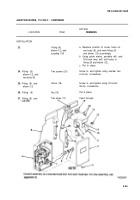
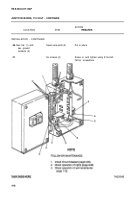
Fitting (1)
29.
Coupling (3) and
fitting (1)
30.
Elbow (6)
31.
Fitting (1)
32.
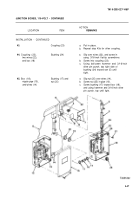
Nipple pipe (10)
33.
Box (12),
nut (13), and
two wires (14)
34.
Nipple pipe (10)
and box (12)
35.
Box (12)
36.
Cover (15) and
box (12)
37.
Nipple pipe (10)
36.
Box (18)
39.
Van body (5)
40.
Van body (5) and
nipple pipe (10)
41.
Box (18) and
van body (5)
42.
Box (18)
Conduit
assembly (2)
Nut (4)
Two covers (7)
Cover (8) and
screw (9)
Bushing (11)
Nipple pipe (10)
with bushing (11)
Bushing(n)
Cover (15)
Four screws (16)
Bushing (17)
Grommet (19)
Grommet (20)
Box (18)
Four screws (21)
Two wires (22)
a. Feed wires through conduit assembly.
b. Put in place.
a. Screw in.
b. Tap left side of nut (4) toward
van body (5) using 3/16-inch drive pin
punch and ball-peen hammer.
Using ball-peen hammer, tap in place.
a. Put cover (8) in place.
b. Screw in screw (9), and tighten using
3/16-inch flat-tip screwdriver.
c. Repeat steps 23 thru 31 b for other side.
Screw in all the way.
a. Slip over two wires (14).
b. Screw pipe (10) into nut (13) until
tight.
a. Screw in toward box (12).
b. Using 3/16-inch drive pin punch and
ball-peen hammer. tap top of bushing
(11) toward van body (5) until tight.
Put in place.
Screw in, and tighten using 3/16-inch
flat-tip screwdriver.
Screw in all the way.
Push in place.
Push in place.
While feeding wires through hole, put
in place.
Screw in, and tighten using number two
cross-tip screwdriver.
Feed through hole in top of box (18).
Back to Top

